Practical Guide: How to Record Your Screen for YouTube
How do YouTubers record their screens? Screen recording provides users with a powerful and convenient way to share and record information on the screen with other viewers. Instead of sending the recorded video directly to everyone who wants to see it, putting the video on YouTube helps achieve easier streaming and more viewers.
Table of Contents
How to Record Your Screen for YouTube with 3 Methods
Luckily, knowing how to record your screen for YouTube is no longer a tough task, you even have more than one choice. In the following parts, we will choose three tools to show you how to use them to record your screen. Here is the list of the three screen recording tools:
- Xbox Game Bar: Windows Built-in Recording Tool
- OBS: Open-Source Software for Video Recording and Live Stream
- 3-Party Screen Recorder: Free and Powerful Windows Screen Recorder & Video Editor
For those who are wondering how to record my screen for YouTube, read the following content, and try step by step, you can easily get a recorded video of your screen.
Method 1. Free & Built-in Tool - Windows Xbox Game Bar
The Xbox app is an app for Windows 8/10/11, Android, iOS, and Tizen, it additionally works as a launcher for PC games installed on a device for Windows. In 2019, Windows released the Xbox Game Bar with new features for Windows 10. It has also become a built-in feature in the following Windows version - Windows 11.
Here we will not introduce the many functions of the Xbox Game Bar one by one. Its most useful function - whether you are playing games or not, is to record the screen and make MP4 videos. Although Xbox Game Bar's screen recording sounds like a perfect function, you should know that there is one drawback: It only works within a single application at a time, and cannot capture the Windows desktop or File Explorer.
Now, follow the detailed guide below, and you can know how to use Xbox Game Bar to record your screen for YouTube.
Step 1. Open the app you wish to record.
Step 2. Press Windows + G on your keyboard to open Xbox Game Bar overlay. Click the Start recording button at the top of the screen.
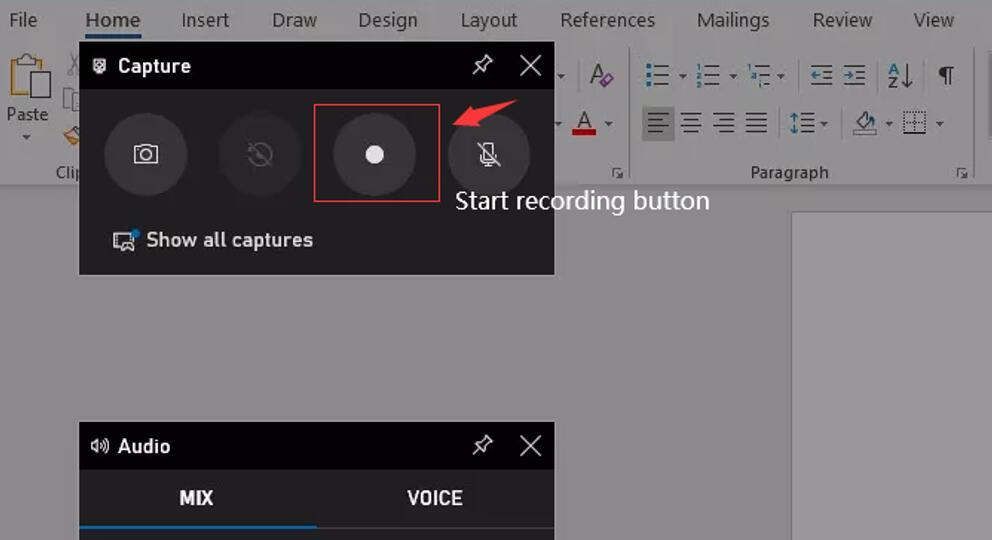
*Or you can press the keyboard shortcut: Windows + Alt +R, the Xbox Game Bar will start to record your screen directly.
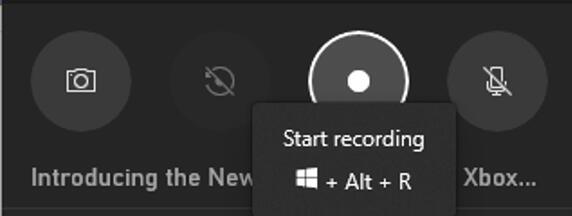
Step 3. Once the recording starts, a recorder controller will appear in the upper right corner of the page. You can check the recording time, press stop, or control your microphone.
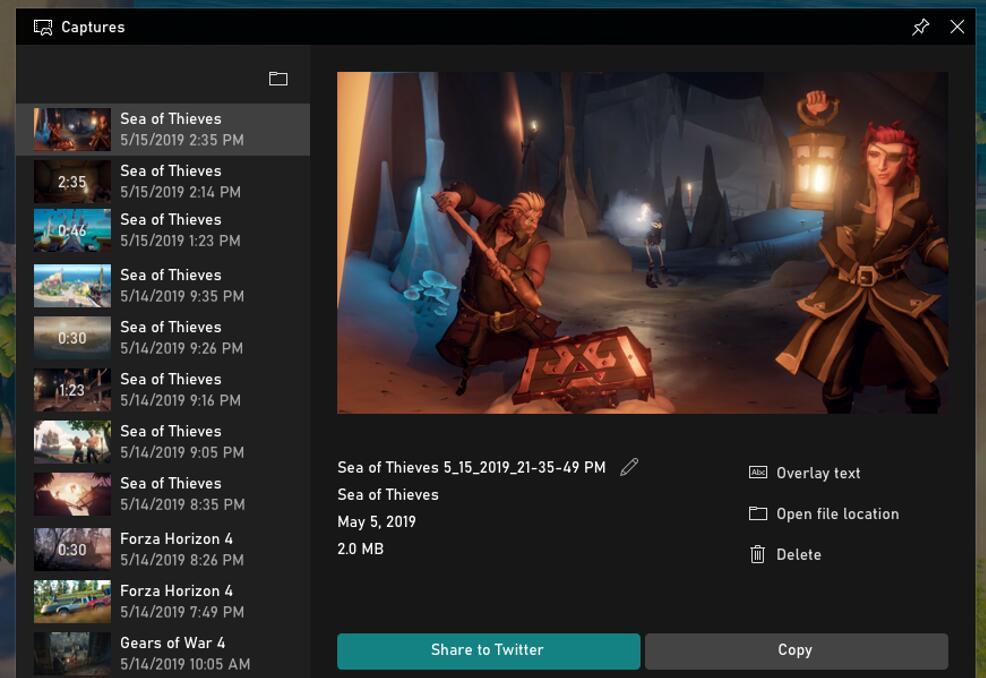
Step 4. Press the stop button to finish recording. Then you will see a message appears on the right side of your screen, telling you that you have recorded a video clip. Click the message, it will open Xbox Game Bar again, and shows you the recorded video files.
Method 2. Open-Source Software - OBS
From the above content of Xbox Game Bar, you should know that it can't record multiple programs at a time and can't record the Windows desktop. So, if you need to record the entire desktop or to show a complex task - for example, showing how to record your screen and upload the video on YouTube - you would need to split the process and record several videos. To simplify the screen recording process for a complex task, you can choose some third-party tools, OBS is one of them.
OBS is a free and open-source screen casting and streaming app. It is available for Windows, macOS, and Linux. Compared with Windows built-in Xbox Game Bar, the most impressive feature of OBS is that it enables you to set up an unlimited number of scenes and create scenes with multiple sources (window captures, images, text, webcams, and so on).
Download and install OBS from its official website, then follow our guide to see how to record your screen.
Step 1. Open and run OBS, it will automatically add a Scene after launching. You could also click the “+” button from the Scenes box at the bottom.
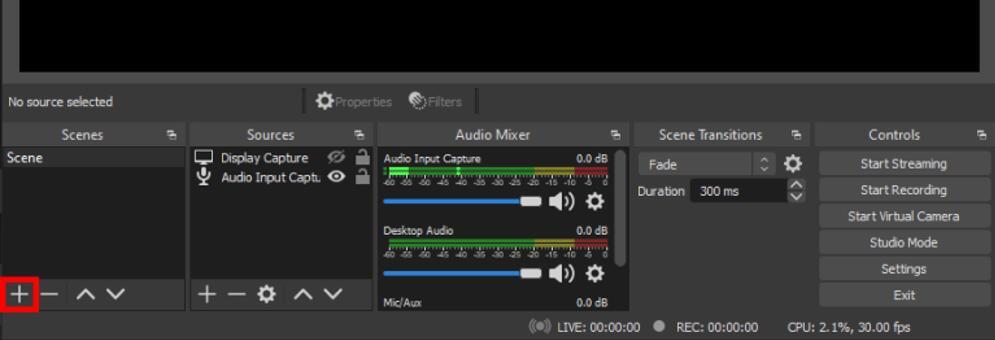
Step 2. Find the Source box at the bottom (next to Scenes), click “+”, and select the Display Capture option.

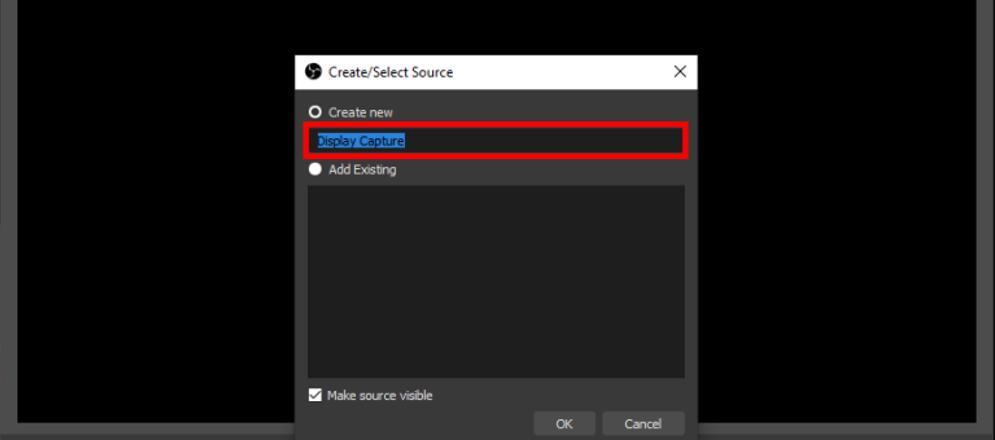
Step 3. A small pop-up window will appear, add a title for your screen record video, and click OK.
Step 4. Another popup will appear. Select the display you want to capture and click OK.
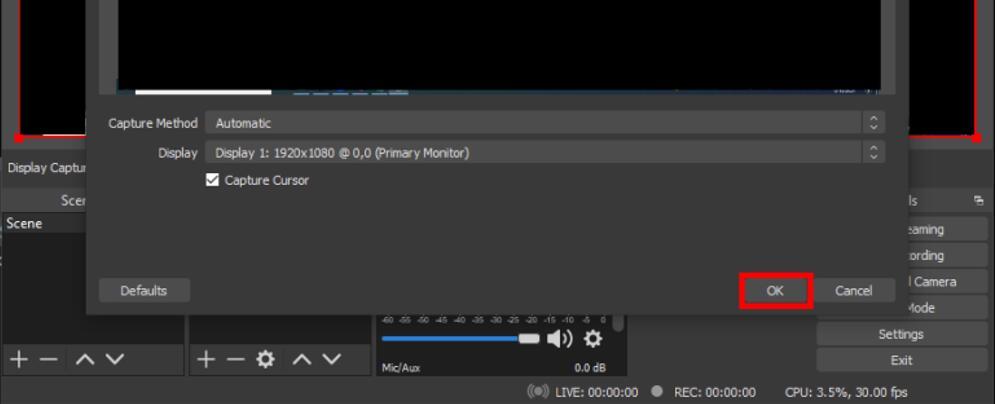
* If you have multiple monitors, click on the little downward arrow to access a drop-down list.
Step 5. Find the Controls box (on the right side), click Start Recording, and OBS will start to record the screen.

You can check the default recording path under Settings > Output > Recording. You could also customize the path from the settings.
Method 3. Free & Powerful Recorder: 3-Party Screen Recorders
If you find the user interface of OBS a bit dull and confusing, you can think about some third-party screed recorders. Usually, the 3-party screen recording software has a more intuitive user interface, more powerful features, and easier recording steps that anyone new to it can start a screen recording within minutes.
Screen recorders are one of the most essential tools for both business and YouTube. The third-party recording program enables a user to capture a digital recording of the contents of a computer screen, from a busy desktop to the screen, your face, videos, and so on. YouTubers frequently make, record, edit, and publish videos and look for comfort and ease of use in any application that they use. The ultimate screen recorder for YouTubers should have more useful features that will allow them to create videos faster than traditional or free recording methods.
How to Record Your Screen for YouTube with 3 Best Screen Recorders
If you're wondering which one is the best screen recorder that you should choose, you can compare multiple screen recorders from some reviews, user feedback, or something like that to find your answer. Here recommends a list of reliable 3-party screen recorders for your reference:
- Filmora Scrn - The finest video screen recording software for gaming and streaming.
- Camtasia - A powerful screen recorder with quizzes and interactive features.
- iTop Screen Recorder - A straightforward screen recorder with basic editing capabilities.
iTop Screen Recorder is the software that is worth a try. It is such a feature-rich tool that offers simple operation. In addition to regular screen recording and gameplay recording, it also supports users for audio recording and scheduled recording (paid). Also, if you need to edit recorded videos, iTop Screen Recorder is a one-in-all tool - it has a built-in video editor, which you can use to add filters, stickers, background music, and subtitles to your recordings. If you are interested in iTop Screen Recorder, download the software and follow the guide below to see how to record your screen with it.
Steps to Record Screen for YouTube
Step 1. Launch the software, select the recording area, full screen, or select region/window.
Step 2. Change the Speaker, Mic, Mouse effect, or Webcam settings.
Step 3. Open the app, file, or game you want to record, and click the red REC button to start.
Step 4. Click the Stop button from the widget to end the recording.
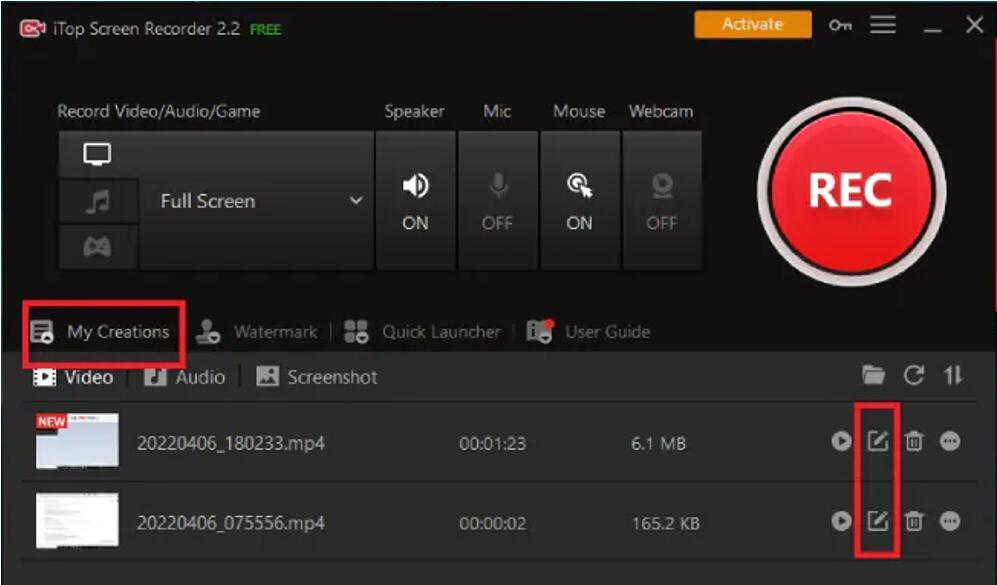
All the recorded videos are saved in My Creation. You can check, access, edit, and delete these videos from here.
3 Screen Recording Tips That Help Make a Better Video
The content above tells you how to use a tool to record a screen. If you further think about your needs, you actually want to know how to record your screen for YouTube. The purpose of putting videos on YouTube is you want higher views and more subscriptions. How? The tips here can help you create better recordings and better videos.
1. Always Have a Plan: If you're going to explain the content you're recording, it’s easy to ramble when you record. So, the advice is always to make a plan. You can write an outline or a script to guide you through the recording.
2. Notice the Length: The screen recording should not be too short or too long. Make sure you don't skip any important information. And make sure you don't give everything detail to your viewer because that would be annoying and dull.
3. Audio Quality Matters: No matter whether you want to record a tutorial video or a gameplay video, you don't want your voice or the background music to sound awful. Checking and properly setting up your mic before starting will help you have better recordings.
The Bottom Line
This article is aimed at telling you how to record your screen for YouTube. In other words, you should not only make a screen recording but also create a recording with good quality. A good tool helps you go further. All the software mentioned in this article is free and easy to use.
If you prefer the Xbox Game Bar, make sure you don't use it to record Windows desktops or multiple programs. If you prefer the OBS, you might need to take some time to learn how to use this software. If you prefer iTop Screen Recorder, it's fine and doesn't sound like too many flaws. But you should note that some advanced features of this software are paid for. If you still don't have decided which tool you want to use, you can also take our tests and reviews about the 5 best free screen recorders into consideration to make a good recording. Wish you could make a great screen recording video on YouTube.
